From Sandra Feltham
Every year, once we’ve recovered from Christmas I have to think about ordering the Paschal candle for the coming Easter. This normally costs between £150 and £200 depending on the decorative motives we choose. This Spring with time on my hands I decided to see if we could save any money on this year’s candle; unfortunately prices across church suppliers are fairly standard so no option there. I remembered that we had 2 boxes of old candles being kept in case anyone wanted to make candles to sell, and I thought that if I used the candles to make one large candle this would: a) save money; b) be a “green“ thing to do by recycling them and; c) mean that we could have a unique candle for 2021. One small hitch in my plan, maybe, was that I had never tried candle making before! How hard could it be? I love crafting and being creative and, surely I could do some research on the internet. It did prove to be a steep learning curve but once I had suggested the idea to Mother Katie and she said she’d love me to make a special candle this year there was no going back!
I was amazed and very pleased to find that in a church in America, All Souls , Berkeley, California, a group of ladies recycle their church candles and make a Paschal candle , every year, and had kindly put a description online of how they went about it. So now I needed to make a plan of how to approach this!
Equipment needed
- Metal jugs for melting and pouring
- Old saucepans to stand the jugs in
- Thermometer to ensure the wax was at the right temperature- rather like Goldilock’s porridge, wax needs to be not to cool but not too hot for pouring and moulding.
- A large mould – a length of drainpipe proved just right
- Wick
- Moulds for the motifs
- Acrylic paints for colouring the motifs once moulded
- Wax unmould spray
- Mould sealant
- Glue
- Lots of old newspaper to protect my kitchen
- An understanding husband – the kitchen would be out of use for a couple of days!
So I ordered everything I needed from Ebay and Amazon or found it around the house and waited my friendly delivery man.
Method
Once all was assembled I began…..
- Prepare the wax- all the old burnt wicks are trimmed off, the candles melted down and the wax filtered, before allowing to solidify in blocks to be remelted when ready to pour the large candle.
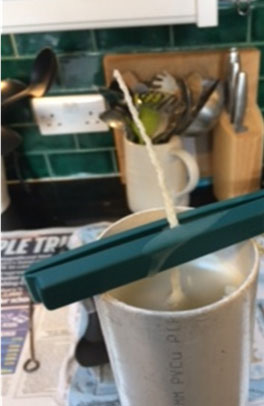
- Prepare the wick – take 3 lengths of wick a little longer than the candle mould and plait together, knotting each end. This is dipped in hot wax and allowed to cool , hanging up so it is straight. This needs to be done using the same wax you are using to make the candle so that it burns at the same rate.
- Prepare the main mould – The cleaned and dried drainpipe needed to be sealed at one end with foil and duct tape. A hole pierced in the centre of the foil to thread the wick through and this held in place with candle sealant (a cross between blue tac and putty) to prevent the hot wax flooding out once poured and the wick held centrally in place so that once the candle solidified the wick was in the right place to burn.
- The mould is then sprayed with mould release (I used cake release spray as this seemed to be the same thing and I already had some) ready for pouring the wax.
- Stand back and shoot a video of the impact of all of this on the Feltham kitchen! (View video)
- Now for the remelting of the wax ready for pouring. The ladies from All Souls warn to put aside a day for this – they were not exaggerating! All the wax needs to be melted and at the same temperature, ready to pour at the same time. Once you have done the first pouring, you then need to keep checking as the wax shrinks back and it needs to be topped up quite a few times. It then needs to be left in a cool place for 24 hours before unmoulding as it needs to be absolutely cold and set.
- The next day it slid out of the mould very easily.
Stage 1 complete – hooray!
Decoration
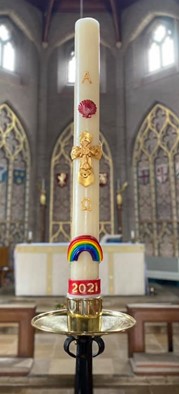
Mother Katie wanted a rainbow – to honour the NHS, a cross and to make it beautiful! But otherwise she left it up to me.
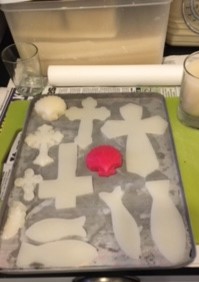
I experimented with various moulds – I found that silicon moulds for cake decoration worked well so I managed to obtain a shell.
The cross I made of a combination one moulded cross overlaid onto another cross shaped cut from soft wax poured into a tray and cut with a biscuit cutter – stuck together and painted with gold acrylic.
The alpha and omega proved a little more tricky … more research and I found you could buy a soft plastic putty material which came in 2 small pots, which when kneaded together allowed you to make your own moulds. I used the symbols on the old Paschal candle to make a mould of each letter and moulded the wax in them.
The numbers for the year, I cut out again using icing cutters from my cake decorating kit.
Once made the motifs had to be shaped to fit the curve of the candle, without melting away or breaking – after some head scratching and trying different ideas I found that filling a jar, the same diameter as the candle, with hot water and pressing the motifs on the outside so I could coax them into the right shape ready to attach with glue, worked well.
The rainbow proved surprisingly difficult. I couldn’t find a suitable silicon mould so had to work out another way – after a number of failed attempts, I turned to my cookie cutters. I thought that if I cut a series of concentric circles, placed them altogether and cut across the centre this would give me a rainbow shape which I could then colour. It worked but this was the most difficult motif to attach to the candle as it kept separating. After 4 attempts I succeeded in something I was happy with.
As I said before it was a steep learning curve and quite time consuming but I did enjoy making the candle and am so please so many people like it. I’m aware of the pitfalls now so if I do make more candles it should be easier!
Now ideas for next year’s……maybe!?
Acknowledgements
I’d like to thank Mother Katie for allowing me to have a go at my first candle, my patient husband Chris who puts up with the kitchen (and other parts of the house) being taken over when I am doing a craft project and the ladies from All Souls for generously sharing their knowhow.